

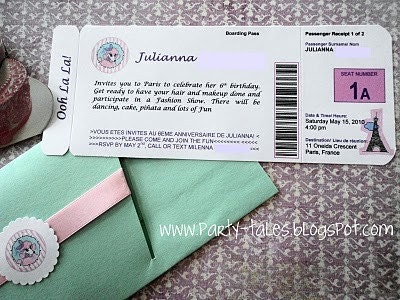
Hi all! Yesterday I showed you the new boarding pass invitations in the shop and
Today I wanted to show you how I made them.
To make these invitations you need:
- White Card stock paper 8.5"x11"
- Paper Cutter
-Scoring tool {optional}
-Perforating tool {optional}
-Corner Punch {optional}
- Any color Card stock paper 8.5"x11" for ticket Holder
- Ticket Jacket Template- Download below

Print your Boarding Invitation design on a 8.5"x11" white card stock paper. Cut along the outer lines using a paper cuter, cut corners using a corner punch or scissors.


With a perforating tool make a mark where the passenger receipt starts; just right of the bar code, to make it detachable just like a real airplane ticket. Make another mark on the left side of the boarding pass, next to the "Aloha" text.


With a perforating tool make a mark where the passenger receipt starts; just right of the bar code, to make it detachable just like a real airplane ticket. Make another mark on the left side of the boarding pass, next to the "Aloha" text.
Ticket Jacket

I made this template you can use to make the ticket jacket. Print your template {Click here to download}

1. Cut along the black lines of your template and trace on top of your coloured 8.5"x11" card stock paper. Using a Paper Cutter, Cut along the outer borders

1. Cut along the black lines of your template and trace on top of your coloured 8.5"x11" card stock paper. Using a Paper Cutter, Cut along the outer borders
2. With a scoring tool make a mark where you have to fold the tabs {3 places- shown in the template with grey lines} If you don't have a scoring tool you can always use a ball point pen without ink or a skewer {don't mark it too hard or your paper will tear}, its just to make a small mark so it folds neatly.
3. Fold the two small tabs.
4. To close the jacket, glue the two small tabs to the other side. Let it dry.
5. Decorate your Ticket Jacket as you wish! You can decorate them with ribbons or anything you like.
Hope you enjoyed my little tutorial!
VOTE FOR ME!
Such a cute and clever design!
ReplyDeleteThank you so much for this post. I want to let you know that I posted a link to your blog in CBH Digital Scrapbooking Freebies, under the Page 6 post on Mar. 16, 2012. Thanks again.
ReplyDeleteWOW!! Love it! I know those are popular. Great tutorial! Thanks for linking up with SweetTalkin' Sunday!
ReplyDeleteHi, the download for the template doesn't work anymore :(
ReplyDeleteCan I get a copy please?
Select a date, time, and duration. You need to choose a suitable and free day for everyone. It’s better to start early, somewhere at lunchtime or a little later, if at the weekend. On weekdays, look at the schedule of the guests, it is advisable also not to start too late! Notify all guests at least two to three weeks before the event, say them about the coolest party ever with the tastiest icy cocktails (ice will be provided with https://icemakershub.com/best-crushed-ice-maker-shaved-ice-machine-reviews/). It is advisable to arrange in advance that all guests can come.
ReplyDeleteHey there..trying to download the template but the link seems broken?
ReplyDelete